We all know the feeling of waking up stiff and sore after a heavy workout the previous day.
Although feeling sore after a workout is a sign of a job well done, we can agree that walking around stiff and sore for days after a workout is best to be avoided.
Luckily, active recovery workouts are more effective for beating delayed onset muscle soreness (DOMS) than just taking a pain killer and waiting for it to pass.[1] They are also accessible to beginners and more advanced athletes alike.
Keep reading to learn more about what active recovery is, how it compares to passive recovery, and some workout tips to help you get started:
Table of contents
What is Active Recovery?
Active recovery includes specific exercises done either during your workout, directly afterward, or in the days following to speed up muscle recovery.
The exercises you do on your active recovery days are often the same ones you would do during regular workouts, with cycling and jogging being two popular options.
The main difference is that they are generally done at between 30-60% of your MHR, also known as your maximum heart rate. Your maximum heart rate will vary depending on your age and can be calculated by subtracting your age from the number 220.
Exercising within a lower range of your MHR will increase your heart rate to get your blood pumping without putting additional strain on the muscles.
Good to know:
Many of us think that lactic acid lingering in our muscles is the cause of DOMS (delayed muscle onset soreness), which is what causes that stiff and sore feeling in the days after your workout. Surprisingly, DOMS is actually the result of eccentric exercise, which creates microscopic tears in our muscles when we exercise. Using active recovery days can ensure we give our bodies the time they need to properly recover post-workout and protect us from the negative effects of overtraining.
Differences Between Active and Passive Recovery
Active and passive recovery are two different processes that differ in many ways, but the end goal is the same — to keep the body strong and healthy.
Doing a rest day workout is an excellent option for days when you feel like you still have energy but are dealing with some residual soreness or stiffness.
Passive rest days are for when you are recovering from an injury or feeling under the weather.
Active Recovery
Active recovery refers to the use of gentle, non-strenuous movements to hasten the muscle recovery process that takes place after high-intensity physical activity.
Examples of active recovery workouts:
lightly jogging in between sets of a sprinting workout.
yin yoga, which includes passive longer-held poses, in the days following a strength training workout.
Passive recovery
Passive recovery is a type of recovery that takes place through rest and stillness. Though it is not as effective as active recovery, passive recovery days are something we all need to take.
Examples of passive recovery:
Benefits of Active Recovery
It’s not always easy to know when to take a rest day, and although it might seem like hitting the gym seven days a week is the fastest way to build the body of your dreams, recovery is an important part of any training plan.
On your recovery days, eating foods that aid in muscle recovery and penciling in an active recovery workout will help you get workout ready faster and experience benefits like:
Reduction in lactic acid buildup
Increase in muscle strength
Improvement in sports performance
Lessened DOMS recovery time
Daily physical activity with less risk of injury
Most professional athletes spend significantly more time in recovery than they do training,[2] and learning the best way to speed up the recovery process is an integral part of maximizing the benefits of consistent training.
Types of Active Recovery Exercises
A number of popular exercises can be converted into an active recovery workout simply by adjusting the level of intensity.
Anyone can do things like cycling and jogging at a minimal level of intensity to benefit muscle recovery as opposed to muscle growth.
Yoga
Using yoga for sports recovery can allow the muscles and the connective tissue around them to loosen and lengthen.
This creates more space for oxygenated blood that contains a number of nutrients essential to the recovery process to make its way to the tissue, supporting the muscle in its recovery process.
Some poses for you to include in your rest day workout are:
Cycling, being a low-impact exercise, is the perfect addition to any recovery workout and can help get your blood pumping while putting minimal strain on the muscles as well as the bones and joints.
To make cycling a recovery workout, it should be done for no more than an hour — significantly less time for anyone new to working out — and at no point should you exceed 60% of your MHR.
You should aim to cycle at a conversational pace, no more than two on a scale of difficulty, and should at all times be able to breathe comfortably through your nose.
Jogging or walking
Whether you choose to jog or walk during your active rest day workout will depend on your level of fitness and the level of intensity you require to get your heart rate up.
For a true active recovery workout, you can try doing 30-40 minutes of low-intensity walking, which should give you all the necessary recovery benefits with minimal strain.
Massage
For anyone wanting to limit their amount of movement, a massage is a great option. It can be either self-administered using your hands, a foam roller, or even a tennis ball or done professionally by a registered massage therapist.
Massage can help reduce tightness, improve blood flow, and even relieve any lingering muscle soreness.
Bottom Line
Active recovery is best used on days when you have the energy to work out but are physically limited by muscle soreness and fatigue.
Whether you decide to walk, cycle, or do yoga, you can trust that the increase in blood flow will help you relieve DOMS and provide your muscles with everything they need to repair, helping you to speed up recovery and get back to your regularly-scheduled workouts faster.
***
if(!isRussia){
//check Cookie Opt out and User consent
if(!run_getCookie(“tp-opt-out”)){
!function(f,b,e,v,n,t,s){if(f.fbq)return;n=f.fbq=function(){n.callMethod?
n.callMethod.apply(n,arguments):n.queue.push(arguments)};if(!f._fbq)f._fbq=n;
n.push=n;n.loaded=!0;n.version=’2.0′;n.queue=[];t=b.createElement(e);t.async=!0;
t.src=v;s=b.getElementsByTagName(e)[0];s.parentNode.insertBefore(t,s)}(window,
document,’script’,’https://connect.facebook.net/en_US/fbevents.js’);
fbq(‘init’, ‘1594940627485550’); // Insert your pixel ID here.
fbq(‘track’, ‘ViewContent’);
}
}
Sean Hayes has developed a reputation for impeccable strength when it comes to deadlifts of all variations. The athlete can now add another achievement to his running laundry list.
On October 30, 2022, Hayes shared an Instagram clip of himself capturing an Axle Deadlift of 474 kilograms (1,045 pounds) during a training session. According to the caption of his post, Hayes’ pull is a new Canadian record, breaking his own mark. Hayes wore a lifting suit and a lifting belt and utilized lifting straps to help him with his feat.
In his Instagram post, Hayes wrote that he initially had loftier ambitions with this Axle Deadlift. Hayes had planned to surpass Mexican strongman Gabriel Peña’s World Record Axle Deadlift of 500 kilograms (1,102.3 pounds) from the 2021 Static Monsters Worldwide (SMW) contest.
(Note: Strongmen such as former World’s Strongest Man (WSM) champions like Eddie Hall and Hafthor Björnsson have deadlifted at least 500 kilograms, but Peña is the only athlete to do it on the Axle deadlift variation, which uses a stiffer, thicker bar and is pulled from 18-inches off the floor.)
Unfortunately for Hayes, even with the extension of his Canadian record, his attempt to exceed Peña came at a health cost.
“[The] goal on the day was [Gabriel Peña’s] World Record, loaded up 500.5 kilograms/1,103 pounds,” Hayes wrote. “The strength was there for it, but the body was not. My left sacroiliac joint popped out badly. I couldn’t walk for 30 minutes …bad-bad back injury. [I’m] gonna see how I wake up, but it’s rough.”
At the time of this writing, there is no further word on Hayes’ injury. At least, for his sake, he didn’t leave the session empty-handed without a record.
According to Strongman Archives, the athlete took home respective fourth-place results at the 2022 Canada’s Strongest Man (CSM) and the 2022 Shaw Classic (Open portion). In early April 2022, he was in temporary possession of the Silver Dollar deadlift World Record with a pull of 560 kilograms (1,235 pounds) from the 2022 Strongman Corporation Canada King & Queen Of The Throne. (Note: Rauno Heinla is the current record holder with a Silver Dollar pull of 579.7 Kilograms (1,278 Pounds) at the 2022 Silver Dollar Deadlift Estonian Championship.)
Hayes hasn’t alluded to his upcoming plans. Based on his recent precedent, it’ll likely be a milestone or competitive result worth writing home about.
In growing numbers, most commercial gyms are adding at least one trap bar to their arsenal of available equipment. As a gym member, you should be counting your blessings.
With all of the unique benefits a trap bar can provide for almost every serious lifter, there’s a good case to make for it to become the number one tool for lower body training. Sorry, barbell, you had a good run.
Credit: carlesmiro / Shutterstock
Though the trap bar can be used for a handful of different exercises, its most commonly put to use for the highly effective trap bar deadlift. Here’s how to get started.
How to Do the Trap Bar Deadlift
The trap bar is typically a hexagonal shape with two long necks on either end for plate loading and a set of handles at the sides. There are often two types of handles on each end, one elevated higher than the other depending on the bar’s orientation.
The trap bar can work well with either the higher handles facing upward or the higher handles facing the floor. In gym-speak, this is referred to as pulling “high handle” or “low handle” and each has its merits. Here’s more about the movement.
Step 1 — Get Set to Pull
Flip the trap bar with the high handles up, which provides a shorter range of motion as you get the hang of the exercise. Step inside the trap bar with a stance that fits your comfort. Something around hip-width is most common for lifters using a barbell, but when you’re lifting a trap bar, a slightly wider stance — between hip-width and shoulder-width — is a more ideal position. With your feet lined up with one another, reach down and grab the handles.
Be sure to hold the bar in the center of the handles for a balanced grip. Since it’s a large cradle, going off center by even a half an inch can cause the trap bar to tip forward or back, which can wreak havoc on your strength and stability.
Form tip: If your gym has them, load the bar with bumper plates if you’re not yet able to lift 45-pound plates on either side. Lighter bumper plates are still the same size as 45-pound iron plates; they provide the proper elevation off the ground to make for the ideal lifting point. Smaller plates will extend the lift’s range of motion, making it a harder and more limiting exercise.
Step 2 — Get Tight
Credit: boyceperformance / YouTube
Set your back position and “wedge” yourself into position. To do this, drop your hips down while keeping your heels on the floor. Think about making your spine “long” by sticking your butt out and simultaneously pushing your chest up tall. Think about squeezing your armpits tight to engage your upper back musculature at the same time.
You should feel tension building in your upper back, arms, glutes, and legs. Take a big breath in and hold it before beginning the lifting phase.
Form tip: Keep your knees in line with your toes. It’s okay if your knees end up a bit in front of them, but they must point in the same direction as your toes to reduce strain on your knee and hip joints.
Step 3 — Pull Up
Credit: boyceperformance / YouTube
Dig your feet into the floor, squeeze your glutes and quads, and stand tall with the weight. Your glutes will tell you when you’ve reached full extension. There’s no need to lean backward or overarch your lumbar spine. Once you’re near the top, exhale as you approach lockout.
Your shoulders, hips, and legs should end up nearly in alignment in the top position. Pause briefly to ensure a strong, stable posture and to minimize any swaying of the weights.
Form tip: Keep your arms straight throughout the entire repetition. Pulling a deadlift with bent arms not only reduces your power output, but dangerously increases stress on the relatively smaller biceps muscle and elbow joint.
Step 4 — Lower the Weight
Credit: boyceperformance / YouTube
Reverse the motion to lower the weight under control. It’s important to remain tight and braced the entire way back down. Think about “sticking your butt out” to ensure your back stays flat and doesn’t round as you descend.
Form tip: As you approach the ground, you have the option to either let the weight briefly glance off the ground (sometimes referred to as “touch and go”) or to freeze and let the weight settle on the floor between reps. Each is valid and perfectly acceptable. What’s not acceptable is lowering quickly and actively bouncing off the floor to use the rebound as momentum, making the next repetition easier.
Trap Bar Deadlift Mistakes to Avoid
Simply following the instructions on proper execution will leave you ahead of the game when it comes to avoiding mistakes, but there are still a few things to consider.
Losing Control of Your Knees
The safe and efficient execution of the trap bar deadlift requires your knees and toes to be aligned. It’s unfortunately very common for knees to cave inward during deadlift. This isn’t ideal as it will place stress on the wrong places (like the medial sides of your knee joint).
Credit: MDV Edwards / Shutterstock
Part of the issue may be in the footwear being used. Too much cushioning, as well as too little support, can highlight the instability of a lifter’s feet and arches. Your knee will almost always follow the arch of your foot. In the event of arch collapse, your knees will be guaranteed to move in toward each other, especially if serious amounts of weight are being lifted.
Avoid it: Be sure to choose good quality, flat footwear that still offers enough support. Furthermore, help yourself by creating a “tripod” with your feet — raise your arches, spread the toes, and dig in to the ground during your initial setup.
Forgetting Your Head Position
You might get so transfixed on your lumbar and thoracic spine(lower and upper back, respectively) that your forget your head is directly connected to another crucial part of the spine — the cervical region. Respecting proper spinal alignment, from top to bottom, is integral to a safe lift.
Credit: YAKOBCHUK VIACHESLAV / Shutterstock
Many lifters will use the sky or ceiling as their “target,” thinking that looking at the place they want to finish will help them through the lift. Though this might help as a visual cue, it isn’t a wise course of action to lift something heavy from the floor while your neck is in full extension (looking upward). Doing so can strain the smaller support muscles of your neck and excessively stress the cervical spine.
Avoid it:Pick a spot two meters (roughly six or seven feet) in front of you on the ground and focus on that spot. It may even help to place an object like your water bottle or cell phone there. Since your head will instinctively follow your eyes, this will keep your neck in the right position.
How to Progress the Trap Bar Deadlift
The trap bar deadlift is adaptable to lifters of many experience levels and abilities. To more finely tune your practice and master the exercise, there are a few specific progressions to consider.
Elevated Trap Bar Deadlift
Adjusting the bar height can be a critical step to customizing your range of motion. If you’re well above-average height, even the high handles might be too low to properly get into a safe and strong pulling position. Placing steps or platforms under each side of the weight plates can put the bar into better alignment.
Of course, it’s essential that you raise both sides to the same height. Double-check your bar before beginning a set to make sure it’s level. An imbalanced bar will put you in an asymmetrical pulling position which would make proper technique nearly impossible.
Deficit Trap Bar Deadlift
Once you’ve mastered the trap bar deadlift (and truly mastered it, not simply gotten tired of learning proper form), you can eventually tackle one of the most challenging progressions, provided you’ve built significant mobility and muscle control.
By standing on a plate or small platform, you increase the range of motion. This is a drastic challenge to total-body mobility, stability, and strength. This can also be used to “bridge the gap” between the high handles and low handles, allowing a more incremental change in the range of motion.
Benefits of the Trap Bar Deadlift
Any type of deadlift is, rightfully, known as an undeniable total-body strength-builder. Because of the postural differences and varied muscle recruitment between a trap bar deadlift and a barbell deadlift, these benefits can be amplified.(2)
Building Better Posture
The trap bar deadlift can be a great way to improve your posture while building strength. Particularly, maintaining a stronger spine is crucial for lifters as they age.(3) For most lifters, the trap bar will be a more accessible version of pulling from the floor and it can allow a lifter to continue training heavy without excessive lower back strain.
Better for Mobility Issues
If you’re a lifter who struggles to achieve the mobility or flexibility for a conventional barbell deadlift, the high handles of the trap bar coupled with its neutral grip will allow you to much more easily attain the correct starting position. This lets you get into a powerful and efficient pulling position with less joint strain.
Ideal Position for Tall Lifters
The trap bar deadlift is a staple movement among professional sports athletes, who often carry larger levers and taller frames. Think of the typical NBA or NFL player — big overall frames often with long limbs.
If you’re a taller or long-legged lifter, you’ll probably be counting your blessings by incorporating the trap bar deadlift instead of force-feeding your oversized body a barbell deadlift. The mobility demands and overall body position, once again, become the movement’s biggest saving grace.
Versatile Strength-Builder
Plainly put, this lift is great for everyone in the gym. Whether it’s a lifter who can’t quite get the flexibility or mobility for a barbell deadlift, a taller lifter with unfavorable leverages for the deadlift pattern, or a strength- or size-focused trainee who’s looking to get more out of a deadlift as far as quadriceps strength and development go.
The trap bar deadlift, with all things equal, is one of the few “do no wrong” exercises that can be invaluable to pretty much anyone’s program.
Muscles Worked in the Trap Bar Deadlift
The deadlift is a movement that spares very few muscles , from gripping the bar with your hands, to stabilizing your core and upper back, to driving wth your legs. However, it is predominantly a lower body movement.
Quadriceps
When performing a trap bar deadlift, there’s one major change to the muscles involved compared to the more familiar barbell deadlift. Since your body can sit a bit taller because your knees and shins can travel forward (due to no bar blocking them), it creates a deeper knee flexion and includes much more quadriceps involvement.(4)
This makes the trap bar deadlift a more complete leg exercise that, unlike the barbell deadlift, isn’t as biased toward the glutes and hamstrings. This is also important information to consider if you struggle with squatting in general, or if you’re dealing with an upper body injury that prevents barbell squatting from being on the menu.
Posterior Chain
Any deadlift movement will heavily recruit the muscles of the posterior chain — especially the glutes, hamstrings, and lower back. However, the overall body position during a trap bar deadlift actually reduces lower back recruitment compared to the barbell movement.
The neutral-grip of the trap bar disperses weight more evenly across your body, decreasing the lower back strain, while your glutes and hamstrings are significantly recruited during hip extension to lift the weight and achieve a locked out position.
How to Program the Trap Bar Deadlift
There’s a little bit less wiggle room here compared to other movements in the gym. The trap bar deadlift usually serves as a substitution to the more common deadlift and is best programmed similarly.
Heavy Weight, Lower Volume
The trap bar deadlift is a huge movement that typically enables a lifter to move the greatest amount of weight possible as far as plate-loaded free weight exercises go. It’s best positioned at or near the very beginning of your workout. That’s when your central nervous system will be the sharpest, enabling the greatest outputs of power and strength.
It’s also when your body as a whole will be the freshest compared to later in the workout. It invites a bit more risk to train a deadlift while fatigued near the end of a workout.
Apply a fair amount of intensity and volume to the trap bar deadlift as the “leading” movement in your lower body workout. Let the remaining lifts of the day serve as “assistance exercises” that take on relatively less volume with lower intensity. A heavy strength workout with the trap bar would be five sets of five, six sets of four, or even eight sets of three, using weight between 85 and 90% of your one-repetition max.
Trap Bar Deadlift Variations
Technically, the trap bar deadlift could be considered a “variation” of the barbell deadlift. However, there are other exercises the compare to the trap bar deadlift for variety and a range of separate benefits.
Low Handle Trap Bar Deadlift
Going “low handle” with the trap bar deadlift is in order once you’ve mastered the standard version of the movement. This will be the first variation most lifters progress to. Keep aware that low handles properly will mean having the requisite mobility to maintain a flat spine.
If you can’t do it, don’t sweat it. Continue going with the high handle and working on your mobility and flexibility until you can safely achieve a deep position with a flat back.
Heels-Elevated Dumbbell Squat
It can be beneficial to lower body health, strength, and size to let your knees go into deep flexion using the right movements. Many gyms have specific a slant board which puts your feet into a forward slope, creating more room for your knee to travel forward while your torso stays upright.
This is huge knee-strengthener and a major quad-developer, but the position takes some getting used to because many lifters have engrained “knees behind toes” for much of their lifting career. Practicing this exercise with light weights is a great way to prepare for the transition from straight bar deadlifts to a trap bar, especially if you’ve done a lot of barbell deadlifting in your days.
Frequently Asked Questions
What’s the difference between the trap bar deadlift and a barbell deadlift?
The trap bar involves a cradle that surrounds you, rather than a straight bar that rests in front of you when deadlifting. This distinction makes for a few major differences when it comes to the overall execution and geometry of the lift. In any big lift, the goal should be for the weight’s center of mass to be positioned over your feet (or within the lifter’s “footprint”). This will be the strongest and most efficient way to move the weight with the lowest potential for risk. In the case of a straight barbell, your shoulder blades need to be positioned over the bar for forces to be properly transferred up the body to support the weight’s vertical path. To achieve this starting position, your shins need to remain fairly vertical which will make for a more angled torso position (a deeper “hinge” at the hip joint). Comparatively, the trap bar doesn’t block your shins from traveling forward, so your knees can position themselves more naturally forward and your hips can drop for a deeper seated position, resulting in a taller torso with less lumbar strain. Also, a barbell asks for a double overhand grip (palm down) in front of the body. That keeps your shoulders in an internally rotated position while bearing load, which can strain the shoulder joints. A trap bar allows a lifter to use a neutral-grip (palms facing each other), which can be better for shoulder health and overall posture. It’s also slightly less challenging to your grip strength. Lastly, using the high handles in the trap bar can reduce the pulling space and overall range of motion, which can suit taller lifters and beginners. All of this explains why many lifters’ trap bar deadlifts are stronger than their barbell deadlifts.
Why do some trap bars look so different from others?
When it comes to individual trap bars, the manufacturer of the bar can make a significant difference. For some trap bars, the entire cradle is longer and the bar’s total mass is heavier — one unloaded bar might weigh 40 pounds while another weighs 75 pounds before you add any plates. Some trap bars have taller high handles, while others are lower. Some can even rotate. Some bars have a wider hexagon, making the handles farther apart, while other brands are a bit tighter to your body. All of these things need to be taken into consideration when it comes to tracking your numbers and paving the way to progressive overload. It may end up that you’re lifting much more (or less) than you think if you’re using the guide of a classic 45-pound Olympic bar as your reference point. Do your best to know the weight and dimensions of the trap bar you most consistently use.
Step into the Trap Bar
The trap bar deadlift is a go-to movement for lower body strength and muscle development. As long as you have the key points down pat, this is a game changer for making the deadlift accessible to lifters who otherwise may be frustrated with the movement. If your gym has this wonderful piece of equipment, put it to good use rather than let it collect dust in the rack. This is the one move in the gym that deserves much more popularity and much less disrespect.
References
Valleser, Christian Wisdom & Santos, Garizaldy. (2017). EFFECT OF DEADLIFT TRAINING ON CORE STRENGTH IN PREVIOUSLY-UNTRAINED MALES. Journal of Physical Education Research. 4. 10-18.
Lake, J., Duncan, F., Jackson, M., & Naworynsky, D. (2017). Effect of a Hexagonal Barbell on the Mechanical Demand of Deadlift Performance. Sports (Basel, Switzerland), 5(4), 82. https://doi.org/10.3390/sports5040082
Carpenter, D. M., & Nelson, B. W. (1999). Low back strengthening for the prevention and treatment of low back pain. Medicine and science in sports and exercise, 31(1), 18–24. https://doi.org/10.1097/00005768-199901000-00005
Camara, K. D., Coburn, J. W., Dunnick, D. D., Brown, L. E., Galpin, A. J., & Costa, P. B. (2016). An Examination of Muscle Activation and Power Characteristics While Performing the Deadlift Exercise With Straight and Hexagonal Barbells. Journal of strength and conditioning research, 30(5), 1183–1188. https://doi.org/10.1519/JSC.0000000000001352
“Don’t skip leg day” has almost become a meme in the gym, warning dedicated lifters to give lower body training as much emphasis, intensity, and attention as their upper body.
That’s all well and good, but even when it comes to “leg day,” many lifters still end up skipping a relatively large portion of their lower body. Not even addressing the flamingo-legged elephant in the room that is calf training. The more urgent body part that deserves your attention is the hamstrings.
Credit: Microgen / Shutterstock
Whether it’s for athletic performance, total-body power, or a complete and well-developed set of legs, here are some must-do movements to target the backs of your thighs.
Best Hamstring Exercises
Romanian Deadlift
While the conventional deadlift is known for building serious power and size in the entire posterior chain (lower back, glutes, and hamstrings), the Romanian deadlift zones in even further on that growth stimulus by adjusting the range of motion and body positioning.
By keeping your legs very slightly bent, put your hamstrings into a longer stretched position while also forcing them to contract harder during hip extension, which both contribute to greater growth.(1)
How to Do the Romanian Deadlift
Stand holding a barbell with a slightly wider than shoulder-width, overhand grip. Pull your shoulder blades back and raise your chest. Slightly bend your knees and push your glutes toward the wall behind you.
Focus on feeling your hamstrings stretch as you “reach” your tailbone to the wall. When the bar reaches as low as possible without rounding your back, drive your heels “through” the ground and push your hips forward to return upright.
Benefits of the Romanian Deadlift
As a barbell movement, the Romanian deadlift allows the use of potentially heavy weights, which contributes to strength gains.
This movement puts the target muscle through a long range of motion with a deep stretch, which benefits muscle growth.
Split-Stance Dumbbell Romanian Deadlift
Single-leg training can be highly beneficial for strength, power, and muscle growth.(2) However, many lifters struggle with balance to the detriment of any single-leg exercise. Taking a staggered or split-stance drastically reduces the balance demands while maintaining the single-leg emphasis.
The split-stance dumbbell Romanian deadlift allows you to focus on working the hamstrings of your lead leg, while your rear leg provides just enough stability to stay steady. Using dumbbells instead of a barbell allows a longer range of motion while reducing lower back strain.
How to Do the Split-Stance Dumbbell Romanian Deadlift
Stand with a dumbbell in each hand by your sides. Take a shoulder-width stance with the toes of one foot in line with the heel of the lead foot. Keep your back straight while pushing your hips and glutes behind you. Allow your hands to face each other as the weights lower toward your front foot. Pull with your front leg, not the rear foot, to stand upright. Perform all reps on one leg before switching sides.
Benefits of the Split-Stance Dumbbell Romanian Deadlift
This movement pairs the benefits of single-leg training with the stability of a bilateral (two-legged) exercise.
The split-stance dumbbell Romanian deadlift allows a significant muscle-building stimulus from relatively light weights, due to the stance and leverage.
Single-Leg Single-Arm Romanian Deadlift
The single-leg, single-arm Romanian deadlift might look, or even sound, more like a circus trick than a serious training exercise. But it’s a top-level choice for muscle-building tension and high-performance athleticism.
By requiring one leg to provide stability and the opposite arm to carry the weight, you’re creating a total-body movement that hits your legs, core, and back like nothing else.
How to Do the Single-Leg Single-Arm Romanian Deadlift
Stand with a dumbbell in your left hand, by your side with your palm facing your body. Slightly bend your right knee, lean forward at your hips, and let your left leg raise into the air as the weight moves toward the ground. Avoid twisting your shoulders or rounding your spine. Move slowly to control the weight and maintain balance. When you’re reached as far as your mobility allows, slowly return to the starting position. Perform all reps on one side before switching hands and legs.
Benefits of the Single-Leg Single-Arm Romanian Deadlift
This comprehensive exercise works the “posterior oblique sling” — a series of muscles which play a key role in posture, especially when walking and moving.
The single-leg, single arm Romanian deadlift strongly works the oblique muscles of the abs and core.
Stabilizer muscles in the ankles, knees, hips, and shoulders are recruited, making the exercise an efficient way to improve joint health.(3)
Standing Leg Curl
The standing leg curl machine can be found in several different but similar varieties. Some allow your non-working foot to be planted firmly on the ground in a fully standing position while other machines, sometimes called “kneeling leg curls” have a specialized pad to support your non-working leg in a bent position. The overall result and performance is the same with either.
Standing leg curls allow you to emphasize knee flexion (bending your leg), a key function of the hamstring muscle. An added benefit of the standing machine is performing the work unilaterally, targeting each leg on its own.
How to Do the Standing Leg Curl
Setup in the machine with the curl pad placed just above the ankle of the working leg. Secure your torso in position using any available handles. Brace your core and squeeze the heel of your leg toward your glutes. Achieve a complete range of motion. Lower the weight under control until your leg is fully straightened. Perform all reps on one side before switching legs.
Benefits of the Standing Leg Curl
The standing leg curl applies constant tension to the target muscle, unlike free weight movements which apply varying levels of resistance due to gravity.
Unilateral (single-leg) training can help to address and correct muscular imbalances between sides.
The design of the machine limits your ability to reduce muscle activation by using full-body momentum to swing the weight.
Seated Leg Curl
The seated leg curl, like many machines, requires some individualized setup for the most productive training experience. Most machines have an adjustable back pad, thigh support, and ankle pad which must be correctly set in place to keep your body in the most efficient position. Most people, however, skip this crucial step.
This strict movement can provide an intense hamstring contraction with little to no contribution from other body parts, making it an ideal muscle-builder.
How to Do the Seated Leg Curl
Adjust the back pad to position your knee joint in line with the pivoting leg attachment. Set the thigh pad to secure against the tops of your quadriceps. Adjust the ankle pad to sit just above your heel. Brace your core and drive through your heels to reach a full contraction, with your feet well-under the seat of the machine. Straighten your legs under control.
Benefits of the Seated Leg Curl
The seated leg curl puts the body in nearly identical positioning as the quadriceps-focused leg extension while training the direct opposite muscle group, making the two movements an ideal superset.
This machine provides significant support which eliminates momentum and removes your ability to lift the weight using anything but strict hamstring activation, leading to a greater muscle-building stimulus.
The seated position changes the stretch on your hamstring muscles, which may contribute to greater growth compared to a lying leg curl.(4)
Lying Leg Curl
The lying leg curl may be the most popular hamstring exercise, but it’s also one often done incorrectly. Many lifters hike their hips off the pad as they curl, which shifts focus away from their hamstrings and onto their glutes and hip flexors.
To maximize hamstring recruitment, it’s essential to keep your hips pinned to the pad throughout the entire repetition. Some lifters find it necessary to raise their upper body onto their forearms, or even hold themselves up using straight arms, to keep their hips in position.
How to Do the Lying Leg Curl
Lie face down on the machine with the pad resting above your ankles. Flex your abs to ensure a stable upper body. Steadily bring your heels as close as possible to your glutes. Ideally, they should be able to touch briefly. Lower the weight under control.
Benefits of the Lying Leg Curl
The lying position puts your hamstrings into a long stretched position, which can help improve hamstring flexibility and growth.
The lying leg curl allows for a strong peak contraction, which can contribute to building strength and muscle.
High Leg Press
The leg press is a common and effective exercise for quadriceps growth, but a slight foot adjustment can shift muscle recruitment and emphasize your hamstrings.
Setting your feet relatively higher on the pressing platform than in the traditional leg press will emphasize the hamstrings (and glutes) more than the quadriceps.(5) This turns the exercise into a highly effective hamstring movement which also allows relatively heavy weights.
How to Do the High Leg Press
Sit in a leg press machine and place your feet shoulder-width apart with your toes near the top of the foot platform. Keep your feet flat as you lower the weight as far as your mobility allows. Your lower back should remain in contact with the pad at all times. From the bottom position, straighten your legs to near lockout.
Benefits of the High Leg Press
The high leg press allows you to work the hamstrings using heavy weights, which contributes to muscle growth and strength gains.
This leg press variation can be performed toward the end of a hamstring-focused workout, to fully exhaust the fatigued muscle, or at the beginning of a hamstring workout to overload the target muscle with heavy weights.
Unlike many exercises in the gym, the kettlebell swing primarily emphasizes the concentric (lifting) phase of each repetition with relatively less emphasis on the eccentric (lowering) phase. This helps to improve power output while also stimulating muscle growth.
How to Do the Kettlebell Swing
Stand with your feet well-beyond shoulder-width apart, with a kettlebell on the ground several inches in front of your toes. Bend your legs slightly and drive your hips back as you grab the top handle of the kettlebell using a palm-down grip with both hands. Pull the kettlebell back toward your body, letting it swing just behind your legs. Brace your core and keep your back straight as you contract your lower body to bring the weight near chest-height using the hip drive, not actively lifting with your arms. Allow the weight to fall back along its path just behind your legs and repeat.
Benefits of the Kettlebell Swing
The kettlebell swing is shown to improve overall strength and explosive power.(6)
This dynamic movement builds grip strength, core strength, cardiovascular conditioning, and metabolic stress for a muscle-building stimulus.
Because it requires minimal equipment and limited space, the swing is a convenient and space-efficient way to train your lower body. This makes it ideal for home gyms or those with limited access to weights.
Slider Leg Curl
If your home gym doesn’t have a pair of furniture sliders, you’re missing out on an extremely effective addition that opens up plenty of new exercises for the entire body. For your leg workouts, specifically, they’re a perfect alternative to any leg curl machine.
The sliders allow you to perform knee flexion on nearly any surface (rug, tile, gym flooring, etc.). Because they’re designed to literally slide on the ground, they also require increased core engagement, so your abs and hips will be working harder than during any machine-based curl.
How to Do the Slider Leg Curl
Lie on the ground with your legs straight and a slider under each heel. Keep your head and shoulders on the ground as you curl your feet toward your glutes while driving your hips up. Imagine a steel rod running from your chest to your knees — don’t allow your body to bend at the waist. Pause briefly and control both feet as you return to the starting position.
Benefits of the Slider Leg Curl
The slider leg curl is one of the only hamstring curl options in a home gym without a dedicated leg curl machine.
The instability of the sliders increases the core stability demands of the exercise.
The slider leg curl can be progressed like other bodyweight movements using added load, changes in rep speed, or using a single-leg.
Seated Resistance Band Curl
Resistance bands are more commonly associated with upper body exercises, but this lower body alternative is another highly effective machine alternative when you’re in a home gym or traveling.
With the seated resistance band curl, you only need a band, a stationary object to serve as anchor point, and a bench, box, or chair to sit on. This delivers a high-tension exercise targeting the hamstrings with little to no help from other muscles.
How to Do the Seated Resistance Band Curl
Attach a resistance band to an immovable object several feet in front of a box, bench, or chair. Sit on the box with the band behind your ankles and your torso upright. Brace your upper body and extend your legs until they’re nearly straight. Keep your feet close to the ground as you drive your heels back under your body as far as possible. Don’t allow your upper legs to rise, which would take tension off your hamstrings. Hold the contraction for one second before straightening your legs and repeating.
Benefits of the Seated Resistance Band Curl
The seated resistance band curl is an efficient hamstring exercise when training with limited equipment.
Resistance bands offer “accommodating resistance” — more challenging as the band is stretched farther and relatively less challenging in the stretched position— which can reduce strain on the knee joint.
Nordic Hamstring Curl
The Nordic hamstring curl is a relatively advanced exercise because it is, essentially, a leg curl performed with your own bodyweight. However, simple modifications and adjustments can be made so lifters of any experience and strength level can benefit from this powerful movement/
The Nordic hamstring curl is also supported by a significant amount of research showing its benefits for reducing the risk of hamstring injuries in athletes in a number of sports.(7)
How to Do the Nordic Hamstring Curl
Kneel on the ground with your heels locked into position under an immovable object, such as a Smith machine on a very low setting or a heavily loaded barbell. Begin in a “tall kneeling position”, sitting upright with your shins on the ground and a straight line from your knees through your torso to your neck. Maintain a stiff body position as you slowly lower yourself forward to the ground. Keep your hands up and ready to catch yourself. Focus on feeling tension in your hamstrings. When you feel tension reducing, Pull yourself back to an upright position. Alternatively,
Benefits of the Nordic Hamstring Curl
The Nordic hamstring curl is supported by research to help reduce the risk of hamstring injuries in athletes.
Because this movement emphasizes the eccentric (lowering) portion of the range of motion, it creates a significant growth stimulus. However, be aware that any eccentric emphasis can also lead to significant post-exercise muscle soreness.(8)
This is one of the few bodyweight exercises to particularly target the hamstrings with knee flexion (curling), making it effective for exercise variety.
SHELC
The supine hip extension leg curl, or SHELC, is a thorough bodyweight exercise targeting the hamstrings and glutes. It is typically done on an exercise ball, but a similar movement can be done on a large foam roller.
The general movement is similar to the slider leg curl, however, the SHELC is performed through a longer range of motion. The “softness” of the exercise ball also makes the exercise more unstable and recruits more stabilizer muscles in the core, hips, and ankles.
How to Do the SHELC
Lie on the ground with your calves on an exercise ball. Keep your head, shoulders, and elbows flat on the ground throughout the exercise. Press your lower legs into the ball as you raise your hips to the ceiling. Keep a straight line through your entire body as you pull your feet toward your body. Pause briefly at the peak contraction. Slowly straighten your legs and briefly pause, supporting your body in a straight line before repeating the next repetition. Keep your hips elevated until the end of the set.
Benefits of the SHELC
This bodyweight exercise works the hamstrings during hip extension as well as knee flexion, the two key functions of the muscle, which can lead to a greater growth stimulus compared to other exercises.
The instability of the exercise ball increases core stability requirements, as well as recruitment of smaller lower body muscles, which can help improve joint health.
The Hamstring Muscles
While certain “hamstring exercises” isolate and emphasize the specific hamstring muscles, other movements will recruit other leg muscles including the glutes, quadriceps, and calves.
Hamstrings
Your hamstrings, on the backs of your thighs, are a collection of several similar-functioning muscles including the biceps femoris, on the outer portion of the leg, and the semitendinosus and semimembranosus, both along the inner part of the leg.
Credit: Svitlana Hulko / Shutterstock
Your hamstrings are worked during two primary types of movements. They’re recruited during hip extension — moving your thigh from in front of your body in line under your torso — which is performed during Romanian deadlift variations. The hamstrings are also responsible for knee flexion, or bending your leg, during any type of leg curl.
Glutes
The glutes are a relatively strong muscle involved primarily in hip flexion. They will be recruited to assist during many hamstring movements, particularly hip extension exercises performed with a straight or relatively straight leg. The glutes are minimally involved during leg flexion, making those leg curl variations a higher priority when you want to emphasize the hamstrings over the glutes.
Quadriceps
The muscles on the front of the thigh — the quadriceps — are anatomically opposite from the hamstrings. Not only are they located on the opposite side of the upper leg bone, but they work in an opposite (or antagonistic) role for knee extension or straightening the leg.
However, in certain multi-joint exercises like the high leg press, the quadriceps are recruited to help extend the leg and lift the weight. Similarly, your quads are recruited in exercises like the slider leg curl to control your descent as you straighten your leg and stretch your hamstrings.
Calves
The calf muscles on the back of your lower legs are primarily responsible for flexing and extending your feet. However, part of the calf muscle extends over the knee joint and is recruited during hip flexion. This is why, on certain exercises performed with straight or nearly straight legs, you may feel tension in the back of your knees or your calves.
How Often Should You Train the Hamstrings
In an ideal training scenario, hamstring training would receive as much attention as quadriceps training. However, in reality, many lifters tack on one or two hamstring exercises after a large number of quad-focused movements.
Credit: Maridav / Shutterstock
An effective solution to this less-than-attentive approach to hamstring training is to simply separate the quadriceps and hamstrings into two workouts. Rather than having “leg day,” design a quadriceps workout including squat and lunge variations and perform a separate workout focused on the types of exercises listed above.
While each session will be relatively shorter and can be paired with another body part depending on your training split, attacking each side of your thigh with more focus allows greater training intensity, relatively more volume, and it decreases the chances of “forgetting” to train them.
Whether you’re addressing them directly on their own or as part of a more comprehensive lower body workout, directly training your hamstrings once or twice per week can be an effective way to build muscle and strength while recovering sufficiently.
How to Progress Your Hamstring Training
No matter how often you’re targeting your hamstrings, it’s important to use a variety of exercises which address both functions of the muscle. In any workout, be sure to include Romanian deadlift variations which train hip flexion, as well as performing leg curl variations to work knee flexion.
To prioritize hamstrings during any workout, use several sets of any leg curl as the very first exercise of the day. This pre-exhaust technique fatigues your hamstrings and makes them more likely to reach muscular failure before other body parts trained in additional movements.
This helps to emphasize the hamstrings during exercises in which other muscle groups may receive relatively greater attention (such as the high leg press or even during the traditional squat) and helps to ensure optimal recruitment of the hamstrings.
How to Warm-Up Your Hamstrings
“Hamstring tear” is a phrase that can strike fear into any experienced lifter or athlete. Not only can a hamstring injury require significant recovery time, but it may potentially become a recurring issue requiring ongoing attention and adaptation.
Properly warming up your hamstring muscles, glutes, hips, knees, and ankles can allow for more training intensity with a reduced risk of injury. Beginning each hamstring workout with a simple, low-intensity series of bodyweight squats, unweighted single-leg Romanian deadlifts (modified toe touches), and classic standing leg swings (side to side as well as front to back) can go a long way toward preparing your muscles and joints for more intense training.
No Back Seat for the Hammies
Just because you can’t flex your hamstrings and see them in the mirror is no excuse to pretend they’re not there, literally supporting every step you take and (almost) every move you make in the gym. It’s well-past time to put the back of your thighs front and center, and give your leg development, lower body strength, and athletic power a real kick in the pants.
References
Van Every, D. W., Coleman, M., Rosa, A., Zambrano, H., Plotkin, D., Torres, X., Mercado, M., De Souza, E. O., Alto, A., Oberlin, D. J., Vigotsky, A. D., & Schoenfeld, B. J. (2022). Loaded inter-set stretch may selectively enhance muscular adaptations of the plantar flexors. PloS one, 17(9), e0273451. https://doi.org/10.1371/journal.pone.0273451
Speirs, Derrick E.1,2; Bennett, Mark A.3; Finn, Charlotte V.4; Turner, Anthony P.2. Unilateral vs. Bilateral Squat Training for Strength, Sprints, and Agility in Academy Rugby Players. Journal of Strength and Conditioning Research: February 2016 – Volume 30 – Issue 2 – p 386-392 doi: 10.1519/JSC.0000000000001096
Vleeming, A., Pool-Goudzwaard, A. L., Stoeckart, R., van Wingerden, J. P., & Snijders, C. J. (1995). The posterior layer of the thoracolumbar fascia. Its function in load transfer from spine to legs. Spine, 20(7), 753–758.
Maeo, S., Huang, M., Wu, Y., Sakurai, H., Kusagawa, Y., Sugiyama, T., Kanehisa, H., & Isaka, T. (2021). Greater Hamstrings Muscle Hypertrophy but Similar Damage Protection after Training at Long versus Short Muscle Lengths. Medicine and science in sports and exercise, 53(4), 825–837. https://doi.org/10.1249/MSS.0000000000002523
Escamilla, R. F., Fleisig, G. S., Zheng, N., Lander, J. E., Barrentine, S. W., Andrews, J. R., Bergemann, B. W., & Moorman, C. T., 3rd (2001). Effects of technique variations on knee biomechanics during the squat and leg press. Medicine and science in sports and exercise, 33(9), 1552–1566. https://doi.org/10.1097/00005768-200109000-00020
Lake, Jason P.; Lauder, Mike A.. Kettlebell Swing Training Improves Maximal and Explosive Strength. Journal of Strength and Conditioning Research: August 2012 – Volume 26 – Issue 8 – p 2228-2233 doi: 10.1519/JSC.0b013e31825c2c9b
van Dyk, N., Behan, F. P., & Whiteley, R. (2019). Including the Nordic hamstring exercise in injury prevention programmes halves the rate of hamstring injuries: a systematic review and meta-analysis of 8459 athletes. British journal of sports medicine, 53(21), 1362–1370. https://doi.org/10.1136/bjsports-2018-100045
Hody, S., Croisier, J. L., Bury, T., Rogister, B., & Leprince, P. (2019). Eccentric Muscle Contractions: Risks and Benefits. Frontiers in physiology, 10, 536. https://doi.org/10.3389/fphys.2019.00536
After a four-day contest from Oct. 27-30, 2022, in Austin, TX, Laura Horvath and Justin Medeiros are the Individual champions of the 2022 CrossFit Rogue Invitational. For Medeiros, he successfully defended his Men’s title from last year’s Rogue competition. It’s the latest achievement for the two-time reigning Fittest Man on Earth®. Meanwhile, after a solid third-place finish at the 2022 CrossFit Games, Horvath dominated to capture the Women’s title.
Chandler Smith and Jeffrey Adler joined Medeiros on the Men’s podium in second and third place, respectively. On the Women’s side, former two-time CrossFit Games champion Annie Thorisdottir (second) and 2022 CrossFit Games Rookie of the Year Emma Lawson (third) finished just behind Horvath.
Between 10 different events, the CrossFitters at the 2022 Rogue Invitational had quite the strength and conditioning gauntlet to work through throughout the Austin, TX, weekend. Here’s an overview of how Horvath and Medeiros fared from event to event as they captured their respective victories.
Laura Horvath 2022 Rogue Invitational Event by Event Performance
After a slow start, Horvath stormed ahead of the rest of the field when she won four straight events. Horvath performed so well that she had a 75-point cushion entering the final day of the contest and clinched the Women’s Rogue Invitational title with a pair of top-10 performances at the end for the clincher.
Texas Trail — Ninth place
Ski Bar — 14th place
Back Attack — First place
DT With a Spin — First place
The Turtle — First place
The Duel II — First place
Texas Oak — Second place
Snatch and Press — 19th place
The Goblet — Seventh place
Heavy Grace — Third place
Justin Medeiros 2022 Rogue Invitational Event by Event Performance
Medeiros’ output at the 2022 Rogue Invitational was largely in line with his usual path to success. The athlete maintained a sterling record of consistency, finishing out of the top 10 in two events just twice while notching top-five results in six separate events.
Aside from the general acclaim and prestige of winning a major contest like the Rogue Invitational, Horvath and Medeiros’ exploits earned them quite the lucrative equal cash prize. Both athletes took home $218,868 for their victories. It isn’t the end of the 2022 CrossFit season, but if Horvath and Medeiros wanted to hang up their kettlebells until the 2023 campaign, they’ve certainly earned the right to bask for the time being.
Oleksii Novikov is the champion of the 2022 Strongman Rogue Invitational. This variation of the strength sports contest took place from Oct. 28-30, 2022, in Austin, TX. Novikov’s victory continues an impressive run where the athlete has finished on the podium in 17 of his last 19 contests dating back to September 2020. That same stellar run includes seven victories, perhaps most notably the 2020 World’s Strongest Man (WSM) title.
Trey Mitchell (second place) and Mitchell Hooper (third place) joined Novikov on the podium. Mitchell’s top-two performance is his immediate follow-up to a win at the 2022 Shaw Classic. Meanwhile, Hooper has yet another podium result in his young career after winning each of the recent 2022 Giants Live World Tour Finals and 2022 Arnold Strongman Classic UK competitions. To date, Hooper has failed to qualify for the top three on just one occasion — his debut at the 2022 WSM, where he came in eighth place overall.
Here are the final standings from the 2022 Strongman Rogue Invitational:
To win a major strongman contest, an athlete generally has to be a versatile Swiss Army Knife. Or, in this case, a Ukrainian Army Knife. Novikov won just one event at the 2022 Rogue Invitational, but thanks to an impeccable consistency built around strength and overall conditioning, he finished in the top three in all but one event. Such output is why he eventually stood on top of the podium in Austin, TX.
Here’s an overview of Novikov’s complete performance over six events that helped him capture his first Rogue Invitational title.
Yoke Carry-Overhead Log Lift Medley — Fourth place
Stones Over Hitching Post — Third place
Novikov’s first Rogue title is the latest in a long line of achievements for the strongman superstar. Most might understandably point to his 2020 WSM title as the crowning moment of his career thus far, but the athlete is also a four-time Ukraine’s Strongest Man (2016-2019). He even won Europe’s Strongest Man for the first time in March 2022. Throw in a Hummer Tire Deadlift World Record from the 2022 Shaw Classic, and it’s been quite the competitive run lately for the Ukrainian athlete.
Novikov’s victory at the 2022 Rogue Invitational made for a lucrative prize. The win gave the athlete $114,125 in prize money, the most awarded of any strongman contest in the 2022 calendar year.
In a post on his Instagram, Novikov dedicated a “great end” to his competitive season to his countrypeople in Ukraine, who have been fighting off an invasion from the Russian army since February 2022.
“Like all the victories this year, this one is also dedicated to Ukraine and the Ukrainian people; I love you; you are unsurpassed,” Novikov wrote. “Thank you to everyone who put a hand in the fact that I can train in Ukraine, and as a Ukrainian, a bow to everyone who defends my country. We once again proved in the sports arena that we are the strongest.”
Today I’m going to teach how you to appear more confident.
Why? Because confidence is one of the most important skills in life that you can acquire (other than learning to use the Force, obviously).
I know how important even a little bit of confidence can be in everyday situations, whether it’s negotiating with your boss for a raise, buying a car, giving a presentation, or meeting your fiance’s parents.
We’re naturally attracted to and will have our opinions swayed by those who have (or appear to have) a lot of confidence.
Nerds usually get the short end of the stick in the “naturally confident” department, but that doesn’t mean we can’t acquire it like a new skill, Matrix-style!
So today we’ll discuss five steps that you can take to start seeing a difference in self-confidence immediately.
Here’s what we’ll cover:
Wanna know something interesting? Many of our coaching clients report “increased confidence” as a consequence of our program. It’s because once you’ve changed your nutrition strategy, lost some weight, and learned to pick up a barbell, you start to understand what you’re truly capable of. That’s a huge confidence boost!
If you’d like to learn if our 1-on-1 Online Coaching Program would be a good fit for you, you can click on the image below for more info:
#1) Stop slouching
If you can develop good posture (a trait that can bypass us nerds), you’ll appear approximately 145% more confident within seconds.
I definitely made up that stat, by the way.
I used to have awful posture throughout most of my life (which caused lots of lower back pain). It wasn’t until I made a conscious effort to focus on standing up straight and strengthening my lower back that the pain went away.
In order to stay on target, I actually hung a “POSTURE!” post-it on my bedroom door so I wouldn’t forget each morning.
Here’s how you can improve your posture:
Stand up as TALL as you can, like you’re a puppet and somebody just pulled the string that’s attached to the top of your noggin.
Pull your shoulder blades down and back as far as possible – This will feel really weird if you spend a lot of time hunched over a desk.
Pick your chin up and look straight ahead – stop looking down while walking around, there’s a whole world out there for you to see.
So not this:
If you have trouble pulling your shoulder blades back, a couple of back exercises might help.
#1) Lat Pull-Downs:
#2) Dumbbell Rows:
This will build up the muscles in your upper back and allow you to actually pull those shoulder blades back together.
Want something easier?
Try standing with your heels, butt, and head against a wall, and then pull your shoulder blades back until they’re touching the wall too. Do this daily and increase the length of the stretch each time.
If you spend all day in a chair, try this: sit down in your chair, and then stand back up WITHOUT having to rock forward. If you have to lean forward even slightly, you’re doing it wrong.
Sit straight up like you’re always ready to stand without having to lean forward. Your lower back will probably get tired as hell sitting like this because it’s not used to the new position – work on it.
Do planks every other day (working your way up to two minutes), and you’ll have a rock-solid core and incredibly strong lower back.
This is probably the hardest step of all, as many of us have spent years and years developing poor posture without even thinking about it. But if we spend a month making a concerted effort to have better posture, we’ll be well on our way to a more confident appearance. Pretty soon we won’t even have to think about it!
I mentioned earlier that back exercises like pull-ups and inverted rows can help a lot with posture. If you have no clue where to start on your strength training journey, make sure you download our guide: Strength Training 101: Everything You Need to Know.
It walks you through every aspect of starting a strength training practice, from equipment, and specific workouts, and how to know when you should progress to lifting more weight. You can grab it for free when you join the Rebellion below!
Download our comprehensive guide
Everything you need to know about getting strong.
Workout routines for bodyweight AND weight training.
How to find the right gym and train properly in one.
#2) Slow down
I am terrified of public speaking. Seriously, I hate being in front of even a small crowd. However, you would never know this, given all the speeches I’ve presented over the years.
You know how I did it?
By taking a deep breath, slowing down, and practicing. I still get nervous, but I’ve learned to manage it so well that nobody notices.
What’s the importance of slowing down? When you get nervous, your voice tends to go up a few notes and you’ll talk faster than you realize. These are two dead ringers for “scaredy cat.”
It’s a lesson I learned in wayyy back in college while presenting my senior business proposal.
It’s now time for a flashback…
About thirty seconds into my college presentation – which I thought was going well – I noticed my friend Deepa in the back of the room frantically waving her arms at me, mouthing “SLOOOWWW DOWNNNN.”
I quickly readjusted my speech, talked WAY slower than I thought I needed to, and took long breaths between sentences. She later told me that she couldn’t understand the beginning at all but the rest of it came out perfectly.
The rest of that class was molded by that presentation, so thanks Deepa for saving me!
If you get nervous in front of people no matter how big or small the group, talk slower than you think you need to, and don’t forget to breathe. In your head, it might seem way too slow, but out loud it’s just right.
#3) Smile
People don’t smile enough these days, so we’re bringing it back.
When dealing with any situation or scenario where we’re uncomfortable, it’s easy to get caught up in our heads. We might be frowning without even realizing it.
The solution: smile.
Not a fake smile, not a creepy smile, but a genuine smile.
We’ll work on it.
Don’t know how to smile correctly? Stand in front of a mirror, close your eyes, and look down. Look up, smile, and open your eyes at the same time.
See that smile right there?
THAT’S a genuine smile.
#4) Win the staring contest
Many of us now work from home, hanging out in our underwear and only interacting with our dogs (or maybe this is just me).
But we’ll still come across people like:
The person behind the counter at CVS.
Your waitress at lunch.
Random strangers that you pass on the street.
When was the last time you looked somebody in the eye until THEY looked away first? If you’re like me, you’ve probably always been the first to “flinch.”
I’m not very good at staring contests:
I say no more!
Starting right now, we’re going to be the person that doesn’t look away.
Think of each interaction as a mini-battle – our eyes against theirs.
As long as we’re smiling and blinking, it’ll come across as friendly and warming.
If we’ve always been shy, the first few times doing this will be absolutely nerve-wracking. Try and power through it.
When practicing, you’ll find that lots of folks will ignore your welcoming glance. They’re probably just nervous too.
#5) Get out of your head
If you feel out of place in a situation, remember this: everybody around you probably does too. We all have our own insecurities; just some of us can exist outside of our brains and project confidence.
As a fellow nerd and chronic over-thinker, I know this is tough to do: stop thinking so dang much and just go for it.
Here are some tips for getting out of your head in a social setting:
Once you spot somebody you’re interested in, don’t give yourself more than three seconds before approaching them. Anything beyond that will cause you to over-analyze the situation in your head and probably end up doing nothing. You’ll quickly learn that “if you don’t ask, the answer is always no,” so you have nothing to lose.
Introduce yourself immediately to strangers at a party – get the awkwardness out of the way immediately, and you’ll come across as cool and collected.
Once you have your speech or presentation prepared, don’t give yourself hours to get nervous – concentrate on something else to occupy your mind until it’s time to present. Don’t overthink, just follow the plan and talk slowly.
Ralph Waldo Emerson once said:
He who is not everyday conquering some fear has not learned the secret of life.
I bet those three things listed above seem scary to 95% of the population (they all scare the bejeezus out of me, which is precisely why I force myself to do them).
Part of building confidence is taking risks and having the ability (and the guts) to do stuff that scares you. Around here we call it “20 Seconds of Courage.”
Your mission: Build Confidence Today
As you follow these five steps, you’ll start to appear more confident. That can make some of your encounters more successful…which will instill more confidence in you. Then this will make even MORE of your encounters successful. And so on.
Think of your confidence like a giant snowball with lots of inertia – tough to get started, but once it’s rolling the momentum will take over.
Your homework – while walking down the street with your head held high, shoulders back, and a big smile on your face, make direct eye contact with at least five strangers that walk by and give them a simple “hi.” Remember, they have to be the ones to look away first, not you.
The first few times will feel really awkward, but who cares – you’ll probably never see them again. As you get more “missions” under your belt, you can progress to other more challenging objectives, like striking up a conversation with a stranger, giving a speech, robbing a bank, etc.
One last thing: with great power comes great responsibility.
There is a fine line between having confidence and being cocky – nobody likes the cocky person who is full of themselves. Remember to be humble.
If you’re trying to figure out how to develop true confidence and apply it to your life, I’d check out Mark Manson’s The Confidence Conundrum:
Confidence is not necessarily linked to any external marker. Rather, our confidence is rooted in our perception of ourselves regardless of any tangible external reality.
The obvious and most common answer to the confidence conundrum is to simply believe that you lack nothing. That you already have, or at least deserve, whatever you feel you would need to make you confident.
In other words: Don’t change what you are, just learn to be more confident in who you are.
So, what tips did I miss or mess up? Any other words of wisdom to pass along? Us nerds need all the help we can get!
-Steve
PS: If you’re looking to boost your confidence, I’ll again remind you of our 1-on-1 Online Coaching Program. We work with busy nerds just like you to complete life overhauls, from adjusting nutrition strategies for weight loss to learning how to strength train.
Twisting your ankle while running can occur in the blink of an eye, and a lot of runners don’t even notice the injury or just ignore the problem. If left untreated, a sprained ankle can become an ongoing problem, depending on the severity of the injury and the quality of the rehab. It’s best to treat ankle pain correctly to prevent future injuries and sprains from happening.
What is a sprained ankle?
Since sprained ankles are a common injury for runners, it’s important to know what a sprain feels like and determine how to treat the injury.
Often runners will return to running after an ankle sprain before the ankle has had time to fully heal.Since the body reacts to protect the damaged tissues, your normal stance may be altered without you even noticing – affecting your hips, knees, and ankles. This can cause you to develop imbalances that can harm your running technique and make you more susceptible to future ankle sprains.(1)
Caution
Untreated ankle injuries can also lead to other problems like Peroneal Tendonitis and Posterior Tibial Tendonitis which may result in long-term recovery and surgery in more severe cases. So it’s important to care for the initial injury and give yourself proper recovery time.
Ankle sprain prevention: How you can prevent a sprained ankle
While there is no guarantee that you can avoid a sprained ankle, there are a few things that you can do to improve ankle stability. (2)
Incorporate 15-30 minute warm-up and cool-down exercises before and after your run. These exercises are recommended for preventing all types of sport-related injuries, including a twisted ankle.(3)
Perform exercises designed to promote flexibility, strength, and balance that are great for preventing sprained ankles and other injuries – including stretching, balancing, power, and agility techniques.(4) Try this 8-week yoga program on the adidas Training app to build strength and flexibility!
Consult a specialist if you have a history of ankle injuries or issues to have expert advice to improve ankle stability.
What to do after an ankle sprain
Ankle sprains can vary in degree – the injury can range from a twisted ankle to a ligament tear. You should always let a professional assess your injury, especially if:
you are in a lot of pain
you can’t walk
your ankle is still swollen after 48 hours
The first line of treatment will involve waiting for the swelling and the pain to decrease.
As soon as the foot is pain free and not very swollen anymore, you should add some light exercises to speed up recovery. Don’t go running yet! Try the exercises suggested below, take a walk, go swimming, cycling…any activity that doesn’t cause pain while moving!
Exercises to restore mobility, balance, strength, and flexibility
The following exercises are focused on three key aspects of recovery after an ankle sprain and include:
mobility exercises to release any tension
stability exercises that require controlled strength
stretching exercises that restore flexibility in the affected and surrounding area
Release tension, restore mobility
Exercise 1: Knee circles
How to do the exercise:
Stand with your feet together so they are touching. Bend your knees slightly while keeping your chest lifted and place your hands on top of your kneecaps. Imagine your kneecaps drawing a circle as you move your lower body in a clockwise motion 10 times, and then counterclockwise 10 times.This rotation of the knee and ankle joints is a great warm-up before exercise as well.
Exercise 2: Pronation / Supination
How to do the exercise:
Stand with your feet hip-width apart. Now simultaneously turn both of your feet outward (supination). And then inward (pronation). One repetition includes both pronation and supination. Repeat 10 times.
Increase flexibility
Exercise 1: Achilles tendon & calf stretch
How to do the exercise:
Stand on the edge of a step with your heels not touching the ground. Lower the heel of the injured foot towards the ground to stretch your calf, keeping your knee straight. Bend the knee to stretch the muscles closer to your ankle. Do both or choose the one that feels better for you. Hold for 30 seconds, repeat 2-3 times.
Exercise 2: Heel sit
How to do the exercise:
Kneel down and sit back on your heels with your feet extended. You should feel the stretch along your ankles and shins. Hold for 30 seconds, repeat 2-3 rounds. If you want to increase the stretch, pull your knees up towards your body.
Restore balance & strength
Exercise: Single Leg Stand (versions)
How to do the exercise:
Stand on one leg and try to keep your balance. Once you can hold the position for 30 seconds, try a more challenging variation: move your head sideways or close your eyes. You can also try lowering your hand to touch the ground in front of you, behind you, or to either side of you, while standing balanced on one leg.
Exercise 2: Single Leg Squat
How to do the exercise:
Stand up straight. Lift the uninjured foot up from the ground in front of you, keeping the knee extended. Push your hips back and bend the knee of the standing leg to do a squat. Go only as low as you feel comfortable without losing your balance. Push the heel of the standing leg to the ground to rise back up to standing position. Do 5-12 reps, andrepeat 2-3 times.
Consider this:
If time allows, single leg exercises should be done on both sides, not only on the affected side in order to work towards symmetric strength. Make sure to always start with the injured side first.
Sprained Ankle: When can you start running again?
Once you are successfully moving the foot and walking without any pain, you can do a light test run. If you still have pain while running or are not completely ready to start, you can focus on the above-mentioned rehab exercises to restore your tissue capacity before taking up running again. If everything goes well, you canslowly increase the distance per day.
***
if(!isRussia){
//check Cookie Opt out and User consent
if(!run_getCookie(“tp-opt-out”)){
!function(f,b,e,v,n,t,s){if(f.fbq)return;n=f.fbq=function(){n.callMethod?
n.callMethod.apply(n,arguments):n.queue.push(arguments)};if(!f._fbq)f._fbq=n;
n.push=n;n.loaded=!0;n.version=’2.0′;n.queue=[];t=b.createElement(e);t.async=!0;
t.src=v;s=b.getElementsByTagName(e)[0];s.parentNode.insertBefore(t,s)}(window,
document,’script’,’https://connect.facebook.net/en_US/fbevents.js’);
fbq(‘init’, ‘1594940627485550’); // Insert your pixel ID here.
fbq(‘track’, ‘ViewContent’);
}
}
Hunter Labrada has a lot to live up to as a bodybuilder. As the son of a bodybuilding legend, the 1985 Mr. Universe Lee Labrada, the bar of excellence is already set. With relatively high expectations, the younger Labrada is currently locked in on showing out at the 2022 Mr. Olympia. He certainly seems to be on the right track.
On Oct. 26, 2022, Labrada posted a video to his Instagram feed where he ran through a short amount of poses to share where his physique and training currently stand. In the process, he revealed that he weighed a massive 280 pounds the morning he filmed the clip.
Labrada is trying to build on an exemplary result from the 2021 Olympia. According to NPC News Online, this specific iteration of the contest was just Labrada’s second try at bodybuilding’s tentpole contest, and he went from eighth place in 2020 to a fourth-place result in a matter of a year. Based on such a precedent, it wouldn’t be a far cry to see Labrada shine and perhaps even stand on top of the podium in Las Vegas, NV, on Dec. 16-18, 2022.
That said, there’s still plenty of work to do before Labrada can potentially earn the crowning achievement of his career. Between his Instagram feed and YouTube channel, Labrada regularly shares advice about proper training, mass-building, and optimal ways to exercise in manners that he seemingly apply to his own preparation. That should make it no surprise he only focused on prep for competing in the 2022 Olympia, foregoing all other potential contests in the calendar year.
To stand on the top of the bodybuilding mountain, it appears that the same mountain is the only thing in Labrada’s crosshairs.
Here’s an overview of Labrada’s complete career results:
Hunter Labrada | Complete Career Results
2016 National Physique Committee (NPC) Branch Warren Classic (Heavyweight) — First place
2016 NPC San Antonio Extravaganza (Super Heavyweight) — First place
2017 NPC Europa Dallas (Super Heavyweight) — First place
2018 NPC Junior USA Championships (Super Heavyweight) — First place
2018 NPC National Championships (Super Heavyweight) — First place | Earned Pro Card
Thanks to a cadre of elite peers, it’ll be no small task for Labrada to improve upon his top-four result from 2021. Among other big names, two-time reigning Mr. Olympia Mamdouh “Big Ramy” Elssbiay is vying for a three-peat, while a fellow ascending star in Nick Walker is also looking to topple Big Ramy.
It’s a doozy of a field on paper and one that Labrada looks to be pulling out all the stops for.
It seems strength, fitness, and a commitment to excellence in the gym run deep in the Hall family. James Hall, the brother of 2017 World’s Strongest Man (WSM) champion Eddie Hall, has shown off his own unique athleticism for years. A former professional rugby player, most notably for the Bristol Bears in Bristol, England, James Hall now coaches and trains strength sports athletes. If that weren’t enough, he has a new World Record to his name, too.
On Oct. 28, 2022, Hall posted a video to his Instagram channel of himself capturing the 1,000-meter row World Record with a time of two minutes and 39.3 seconds. The mark surpasses the figure of Australian Olympian rower Samuel Loch, who recorded a time of two minutes and 39.5 seconds in July 2016.
Hall has had his sights set on this World record 1,000-meter row milestone for a little while. Much of his recent social media clips feature the athlete training his proficiency on the rowing machine in preparation for an eventual record attempt. With that work having now paid off, Hall seemed overwhelmed with gratitude in his Instagram post while outlining his long journey.
“This time last year, I tried to go sub 2.40 on the SkiErg,” Hall started. “I fell just short, but the training and lessons I learned helped me achieve this today.”
As Hall made his return to rowing on the machine, he soon found he had plenty in the tank and pushed himself accordingly.
“When I started rowing back in August, I had the sole goal of going sub-six,” Hall explained. “My fitness soon came back, and I was able to improve my technique enough to achieve this in a short amount of time. What I discovered was that I was able to hold a similar pace but with less perceived effort.”
The comments of Hall’s post feature a familiar face offering hearty congratulations — his brother Eddie.
“Well done, bro, World Records run in the family,” Eddie Hall wrote in reaction.
As for what the future holds, James Hall seems to be in a place where he can carve his own path as he pleases. With rugby out of the picture, Hall appears to be taking on any new fitness goals as they come on a regular basis. Yet, as this World Record shows, he’s not limiting himself in his ambitions. After all, he is the brother of a strongman legend, and that means he has to build his own great strength legacy by comparison.


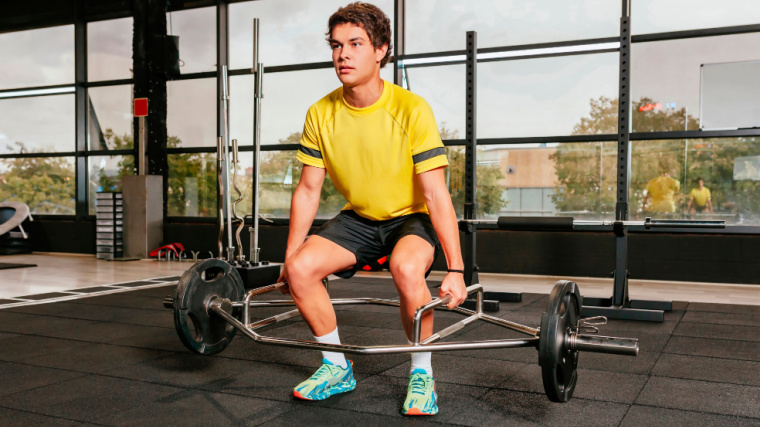
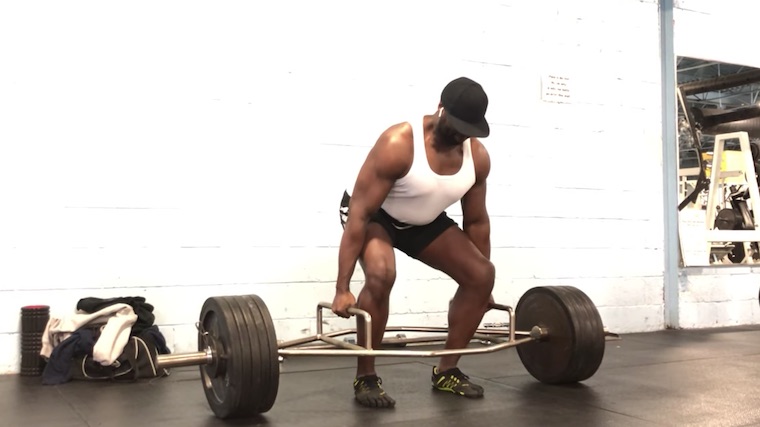
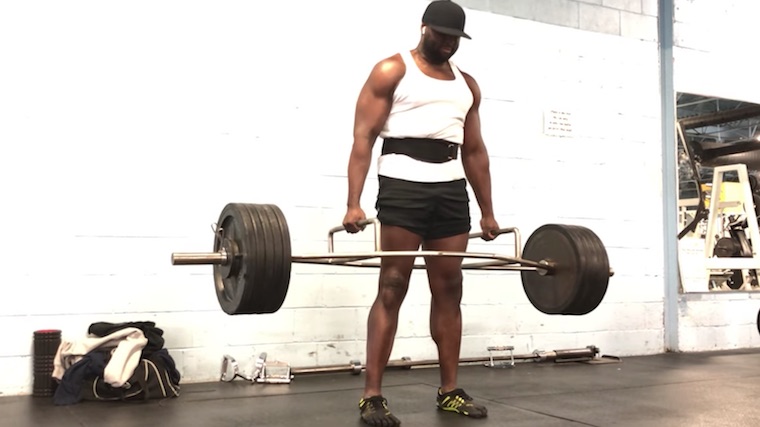
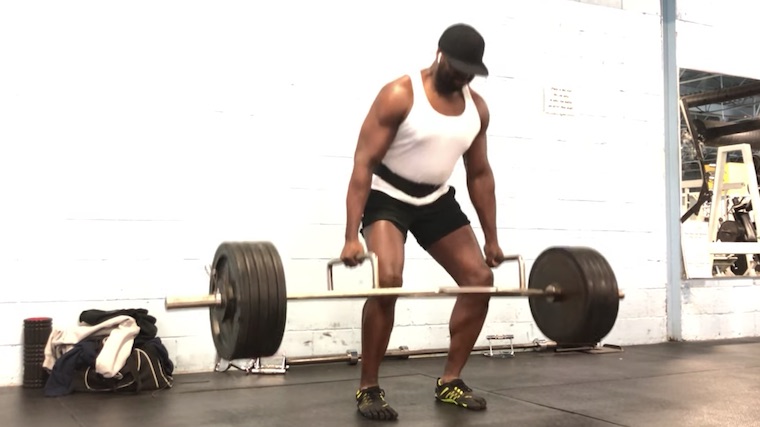

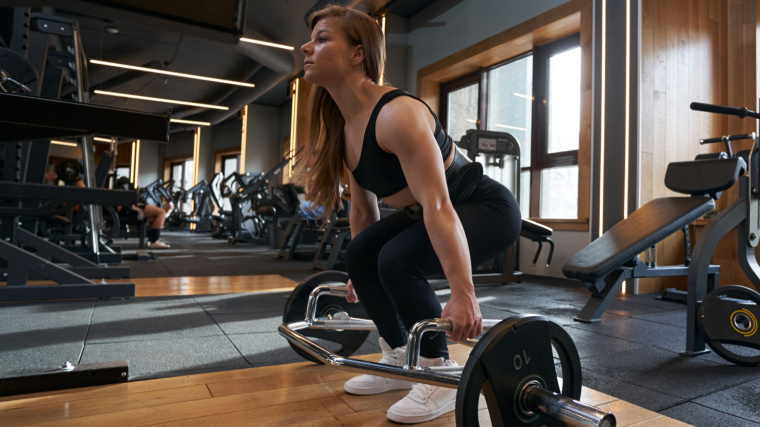


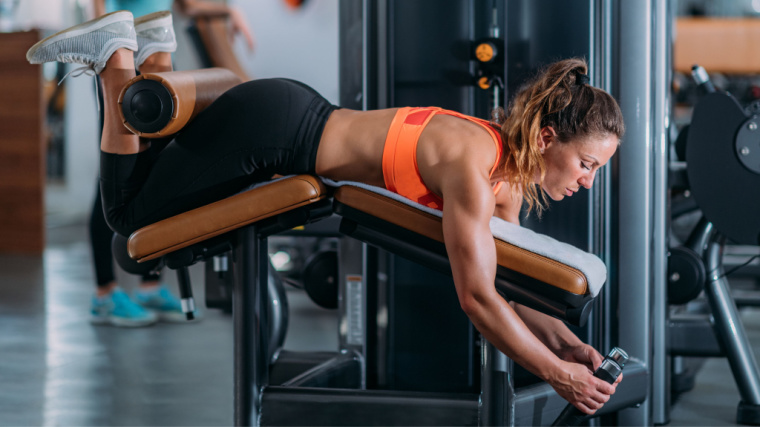
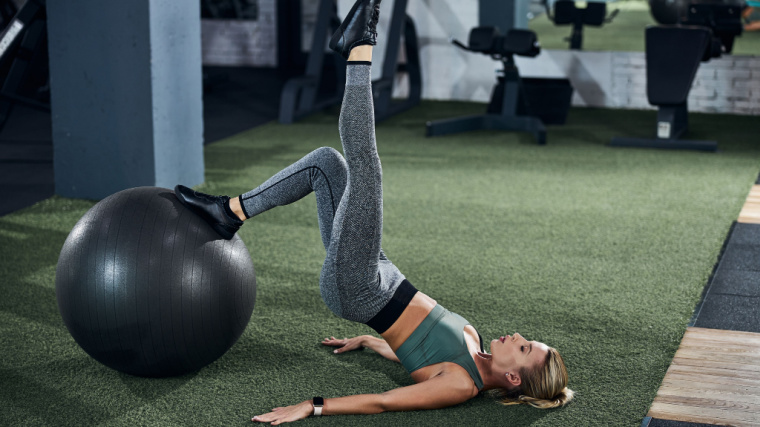
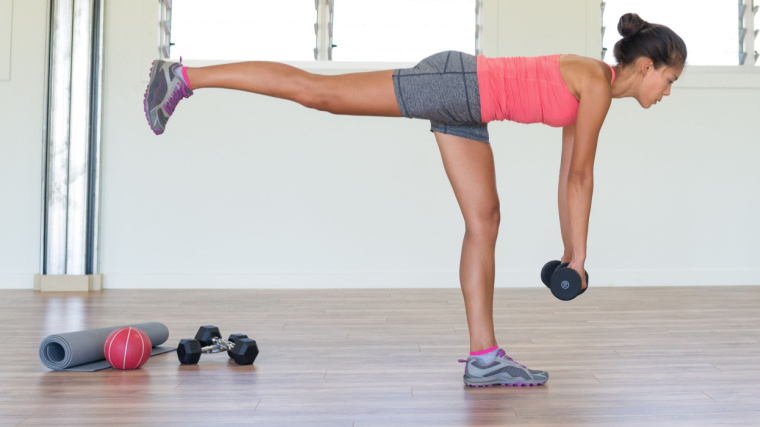


")