[ad_1]
In growing numbers, most commercial gyms are adding at least one trap bar to their arsenal of available equipment. As a gym member, you should be counting your blessings.
With all of the unique benefits a trap bar can provide for almost every serious lifter, there’s a good case to make for it to become the number one tool for lower body training. Sorry, barbell, you had a good run.
Though the trap bar can be used for a handful of different exercises, its most commonly put to use for the highly effective trap bar deadlift. Here’s how to get started.
How to Do the Trap Bar Deadlift
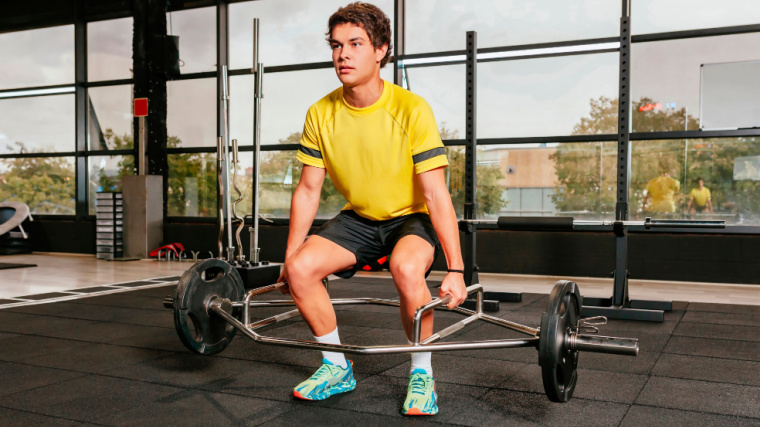
The trap bar is typically a hexagonal shape with two long necks on either end for plate loading and a set of handles at the sides. There are often two types of handles on each end, one elevated higher than the other depending on the bar’s orientation.
The trap bar can work well with either the higher handles facing upward or the higher handles facing the floor. In gym-speak, this is referred to as pulling “high handle” or “low handle” and each has its merits. Here’s more about the movement.
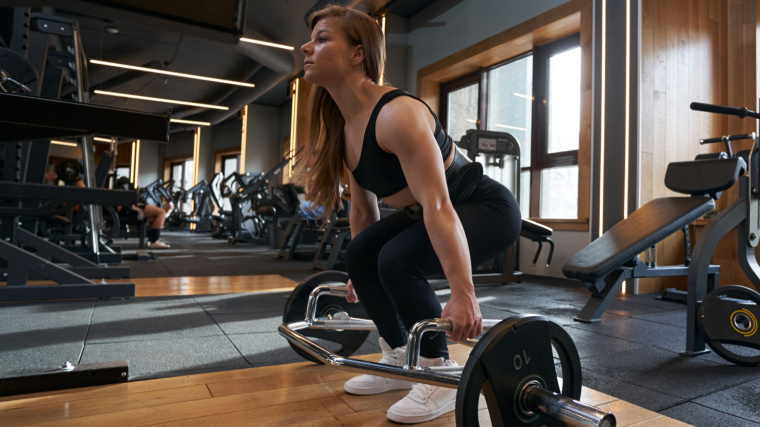
Step 1 — Get Set to Pull
Flip the trap bar with the high handles up, which provides a shorter range of motion as you get the hang of the exercise. Step inside the trap bar with a stance that fits your comfort. Something around hip-width is most common for lifters using a barbell, but when you’re lifting a trap bar, a slightly wider stance — between hip-width and shoulder-width — is a more ideal position. With your feet lined up with one another, reach down and grab the handles.
Be sure to hold the bar in the center of the handles for a balanced grip. Since it’s a large cradle, going off center by even a half an inch can cause the trap bar to tip forward or back, which can wreak havoc on your strength and stability.
Form tip: If your gym has them, load the bar with bumper plates if you’re not yet able to lift 45-pound plates on either side. Lighter bumper plates are still the same size as 45-pound iron plates; they provide the proper elevation off the ground to make for the ideal lifting point. Smaller plates will extend the lift’s range of motion, making it a harder and more limiting exercise.
Step 2 — Get Tight
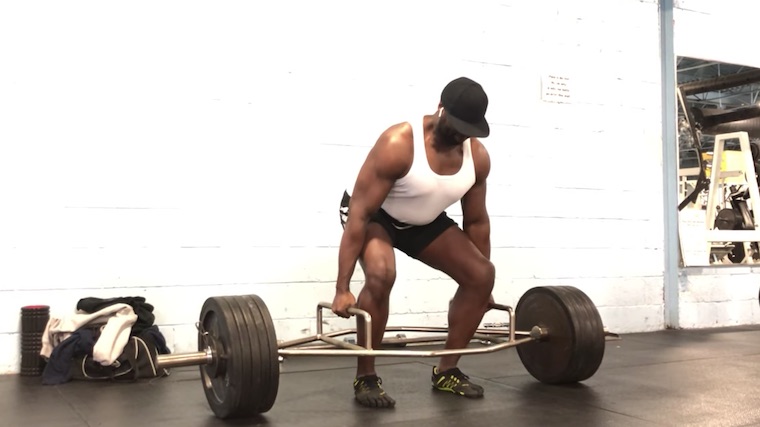
Set your back position and “wedge” yourself into position. To do this, drop your hips down while keeping your heels on the floor. Think about making your spine “long” by sticking your butt out and simultaneously pushing your chest up tall. Think about squeezing your armpits tight to engage your upper back musculature at the same time.
You should feel tension building in your upper back, arms, glutes, and legs. Take a big breath in and hold it before beginning the lifting phase.
Form tip: Keep your knees in line with your toes. It’s okay if your knees end up a bit in front of them, but they must point in the same direction as your toes to reduce strain on your knee and hip joints.
Step 3 — Pull Up
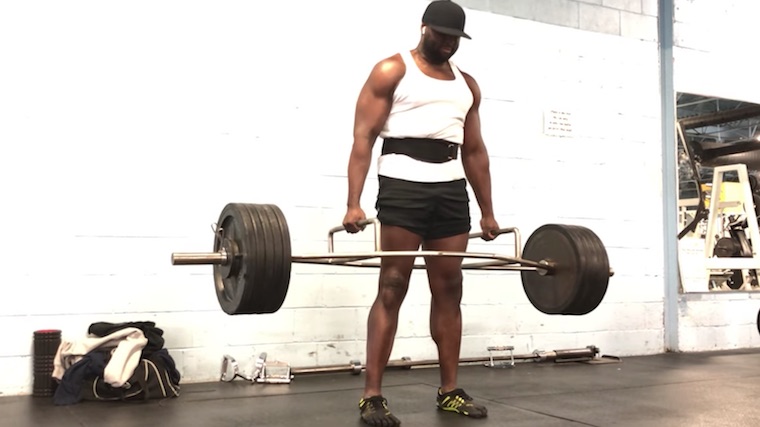
Dig your feet into the floor, squeeze your glutes and quads, and stand tall with the weight. Your glutes will tell you when you’ve reached full extension. There’s no need to lean backward or overarch your lumbar spine. Once you’re near the top, exhale as you approach lockout.
Your shoulders, hips, and legs should end up nearly in alignment in the top position. Pause briefly to ensure a strong, stable posture and to minimize any swaying of the weights.
Form tip: Keep your arms straight throughout the entire repetition. Pulling a deadlift with bent arms not only reduces your power output, but dangerously increases stress on the relatively smaller biceps muscle and elbow joint.
Step 4 — Lower the Weight
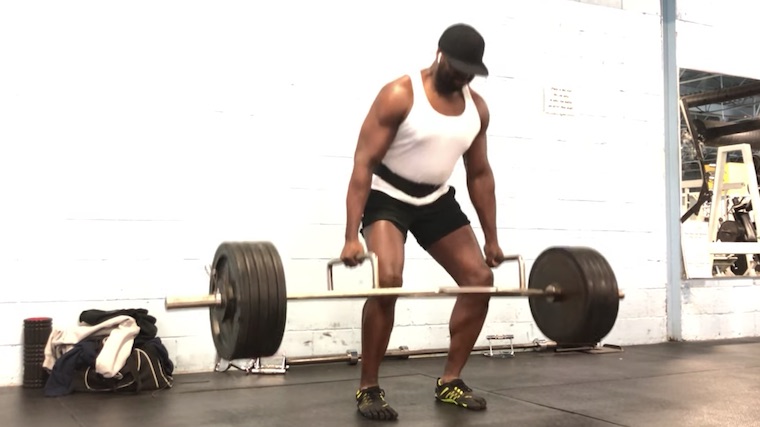
Reverse the motion to lower the weight under control. It’s important to remain tight and braced the entire way back down. Think about “sticking your butt out” to ensure your back stays flat and doesn’t round as you descend.
Form tip: As you approach the ground, you have the option to either let the weight briefly glance off the ground (sometimes referred to as “touch and go”) or to freeze and let the weight settle on the floor between reps. Each is valid and perfectly acceptable. What’s not acceptable is lowering quickly and actively bouncing off the floor to use the rebound as momentum, making the next repetition easier.
Trap Bar Deadlift Mistakes to Avoid
Simply following the instructions on proper execution will leave you ahead of the game when it comes to avoiding mistakes, but there are still a few things to consider.
Losing Control of Your Knees
The safe and efficient execution of the trap bar deadlift requires your knees and toes to be aligned. It’s unfortunately very common for knees to cave inward during deadlift. This isn’t ideal as it will place stress on the wrong places (like the medial sides of your knee joint).

Part of the issue may be in the footwear being used. Too much cushioning, as well as too little support, can highlight the instability of a lifter’s feet and arches. Your knee will almost always follow the arch of your foot. In the event of arch collapse, your knees will be guaranteed to move in toward each other, especially if serious amounts of weight are being lifted.
Avoid it: Be sure to choose good quality, flat footwear that still offers enough support. Furthermore, help yourself by creating a “tripod” with your feet — raise your arches, spread the toes, and dig in to the ground during your initial setup.
Forgetting Your Head Position
You might get so transfixed on your lumbar and thoracic spine(lower and upper back, respectively) that your forget your head is directly connected to another crucial part of the spine — the cervical region. Respecting proper spinal alignment, from top to bottom, is integral to a safe lift.
Many lifters will use the sky or ceiling as their “target,” thinking that looking at the place they want to finish will help them through the lift. Though this might help as a visual cue, it isn’t a wise course of action to lift something heavy from the floor while your neck is in full extension (looking upward). Doing so can strain the smaller support muscles of your neck and excessively stress the cervical spine.
Avoid it: Pick a spot two meters (roughly six or seven feet) in front of you on the ground and focus on that spot. It may even help to place an object like your water bottle or cell phone there. Since your head will instinctively follow your eyes, this will keep your neck in the right position.
How to Progress the Trap Bar Deadlift
The trap bar deadlift is adaptable to lifters of many experience levels and abilities. To more finely tune your practice and master the exercise, there are a few specific progressions to consider.
Elevated Trap Bar Deadlift
Adjusting the bar height can be a critical step to customizing your range of motion. If you’re well above-average height, even the high handles might be too low to properly get into a safe and strong pulling position. Placing steps or platforms under each side of the weight plates can put the bar into better alignment.
Of course, it’s essential that you raise both sides to the same height. Double-check your bar before beginning a set to make sure it’s level. An imbalanced bar will put you in an asymmetrical pulling position which would make proper technique nearly impossible.
Deficit Trap Bar Deadlift
Once you’ve mastered the trap bar deadlift (and truly mastered it, not simply gotten tired of learning proper form), you can eventually tackle one of the most challenging progressions, provided you’ve built significant mobility and muscle control.
By standing on a plate or small platform, you increase the range of motion. This is a drastic challenge to total-body mobility, stability, and strength. This can also be used to “bridge the gap” between the high handles and low handles, allowing a more incremental change in the range of motion.
Benefits of the Trap Bar Deadlift
Any type of deadlift is, rightfully, known as an undeniable total-body strength-builder. Because of the postural differences and varied muscle recruitment between a trap bar deadlift and a barbell deadlift, these benefits can be amplified.(2)
Building Better Posture
The trap bar deadlift can be a great way to improve your posture while building strength. Particularly, maintaining a stronger spine is crucial for lifters as they age.(3) For most lifters, the trap bar will be a more accessible version of pulling from the floor and it can allow a lifter to continue training heavy without excessive lower back strain.
Better for Mobility Issues
If you’re a lifter who struggles to achieve the mobility or flexibility for a conventional barbell deadlift, the high handles of the trap bar coupled with its neutral grip will allow you to much more easily attain the correct starting position. This lets you get into a powerful and efficient pulling position with less joint strain.
Ideal Position for Tall Lifters
The trap bar deadlift is a staple movement among professional sports athletes, who often carry larger levers and taller frames. Think of the typical NBA or NFL player — big overall frames often with long limbs.
If you’re a taller or long-legged lifter, you’ll probably be counting your blessings by incorporating the trap bar deadlift instead of force-feeding your oversized body a barbell deadlift. The mobility demands and overall body position, once again, become the movement’s biggest saving grace.
Versatile Strength-Builder
Plainly put, this lift is great for everyone in the gym. Whether it’s a lifter who can’t quite get the flexibility or mobility for a barbell deadlift, a taller lifter with unfavorable leverages for the deadlift pattern, or a strength- or size-focused trainee who’s looking to get more out of a deadlift as far as quadriceps strength and development go.
The trap bar deadlift, with all things equal, is one of the few “do no wrong” exercises that can be invaluable to pretty much anyone’s program.
Muscles Worked in the Trap Bar Deadlift
The deadlift is a movement that spares very few muscles , from gripping the bar with your hands, to stabilizing your core and upper back, to driving wth your legs. However, it is predominantly a lower body movement.
Quadriceps
When performing a trap bar deadlift, there’s one major change to the muscles involved compared to the more familiar barbell deadlift. Since your body can sit a bit taller because your knees and shins can travel forward (due to no bar blocking them), it creates a deeper knee flexion and includes much more quadriceps involvement.(4)
This makes the trap bar deadlift a more complete leg exercise that, unlike the barbell deadlift, isn’t as biased toward the glutes and hamstrings. This is also important information to consider if you struggle with squatting in general, or if you’re dealing with an upper body injury that prevents barbell squatting from being on the menu.
Posterior Chain
Any deadlift movement will heavily recruit the muscles of the posterior chain — especially the glutes, hamstrings, and lower back. However, the overall body position during a trap bar deadlift actually reduces lower back recruitment compared to the barbell movement.
The neutral-grip of the trap bar disperses weight more evenly across your body, decreasing the lower back strain, while your glutes and hamstrings are significantly recruited during hip extension to lift the weight and achieve a locked out position.
How to Program the Trap Bar Deadlift
There’s a little bit less wiggle room here compared to other movements in the gym. The trap bar deadlift usually serves as a substitution to the more common deadlift and is best programmed similarly.
Heavy Weight, Lower Volume
The trap bar deadlift is a huge movement that typically enables a lifter to move the greatest amount of weight possible as far as plate-loaded free weight exercises go. It’s best positioned at or near the very beginning of your workout. That’s when your central nervous system will be the sharpest, enabling the greatest outputs of power and strength.
It’s also when your body as a whole will be the freshest compared to later in the workout. It invites a bit more risk to train a deadlift while fatigued near the end of a workout.
Apply a fair amount of intensity and volume to the trap bar deadlift as the “leading” movement in your lower body workout. Let the remaining lifts of the day serve as “assistance exercises” that take on relatively less volume with lower intensity. A heavy strength workout with the trap bar would be five sets of five, six sets of four, or even eight sets of three, using weight between 85 and 90% of your one-repetition max.
Trap Bar Deadlift Variations
Technically, the trap bar deadlift could be considered a “variation” of the barbell deadlift. However, there are other exercises the compare to the trap bar deadlift for variety and a range of separate benefits.
Low Handle Trap Bar Deadlift
Going “low handle” with the trap bar deadlift is in order once you’ve mastered the standard version of the movement. This will be the first variation most lifters progress to. Keep aware that low handles properly will mean having the requisite mobility to maintain a flat spine.
If you can’t do it, don’t sweat it. Continue going with the high handle and working on your mobility and flexibility until you can safely achieve a deep position with a flat back.
Heels-Elevated Dumbbell Squat
It can be beneficial to lower body health, strength, and size to let your knees go into deep flexion using the right movements. Many gyms have specific a slant board which puts your feet into a forward slope, creating more room for your knee to travel forward while your torso stays upright.
This is huge knee-strengthener and a major quad-developer, but the position takes some getting used to because many lifters have engrained “knees behind toes” for much of their lifting career. Practicing this exercise with light weights is a great way to prepare for the transition from straight bar deadlifts to a trap bar, especially if you’ve done a lot of barbell deadlifting in your days.
Frequently Asked Questions
The trap bar involves a cradle that surrounds you, rather than a straight bar that rests in front of you when deadlifting. This distinction makes for a few major differences when it comes to the overall execution and geometry of the lift.
In any big lift, the goal should be for the weight’s center of mass to be positioned over your feet (or within the lifter’s “footprint”). This will be the strongest and most efficient way to move the weight with the lowest potential for risk.
In the case of a straight barbell, your shoulder blades need to be positioned over the bar for forces to be properly transferred up the body to support the weight’s vertical path. To achieve this starting position, your shins need to remain fairly vertical which will make for a more angled torso position (a deeper “hinge” at the hip joint).
Comparatively, the trap bar doesn’t block your shins from traveling forward, so your knees can position themselves more naturally forward and your hips can drop for a deeper seated position, resulting in a taller torso with less lumbar strain.
Also, a barbell asks for a double overhand grip (palm down) in front of the body. That keeps your shoulders in an internally rotated position while bearing load, which can strain the shoulder joints. A trap bar allows a lifter to use a neutral-grip (palms facing each other), which can be better for shoulder health and overall posture. It’s also slightly less challenging to your grip strength.
Lastly, using the high handles in the trap bar can reduce the pulling space and overall range of motion, which can suit taller lifters and beginners. All of this explains why many lifters’ trap bar deadlifts are stronger than their barbell deadlifts.
When it comes to individual trap bars, the manufacturer of the bar can make a significant difference. For some trap bars, the entire cradle is longer and the bar’s total mass is heavier — one unloaded bar might weigh 40 pounds while another weighs 75 pounds before you add any plates.
Some trap bars have taller high handles, while others are lower. Some can even rotate. Some bars have a wider hexagon, making the handles farther apart, while other brands are a bit tighter to your body.
All of these things need to be taken into consideration when it comes to tracking your numbers and paving the way to progressive overload. It may end up that you’re lifting much more (or less) than you think if you’re using the guide of a classic 45-pound Olympic bar as your reference point. Do your best to know the weight and dimensions of the trap bar you most consistently use.
Step into the Trap Bar
The trap bar deadlift is a go-to movement for lower body strength and muscle development. As long as you have the key points down pat, this is a game changer for making the deadlift accessible to lifters who otherwise may be frustrated with the movement. If your gym has this wonderful piece of equipment, put it to good use rather than let it collect dust in the rack. This is the one move in the gym that deserves much more popularity and much less disrespect.
References
- Valleser, Christian Wisdom & Santos, Garizaldy. (2017). EFFECT OF DEADLIFT TRAINING ON CORE STRENGTH IN PREVIOUSLY-UNTRAINED MALES. Journal of Physical Education Research. 4. 10-18.
- Lake, J., Duncan, F., Jackson, M., & Naworynsky, D. (2017). Effect of a Hexagonal Barbell on the Mechanical Demand of Deadlift Performance. Sports (Basel, Switzerland), 5(4), 82. https://doi.org/10.3390/sports5040082
- Carpenter, D. M., & Nelson, B. W. (1999). Low back strengthening for the prevention and treatment of low back pain. Medicine and science in sports and exercise, 31(1), 18–24. https://doi.org/10.1097/00005768-199901000-00005
- Camara, K. D., Coburn, J. W., Dunnick, D. D., Brown, L. E., Galpin, A. J., & Costa, P. B. (2016). An Examination of Muscle Activation and Power Characteristics While Performing the Deadlift Exercise With Straight and Hexagonal Barbells. Journal of strength and conditioning research, 30(5), 1183–1188. https://doi.org/10.1519/JSC.0000000000001352
Featured Image: MDV Edwards / Shutterstock
[ad_2]
Source link


No comment yet, add your voice below!